
Easy D.I.Y Light-box (+ a Quick Fix Option)
- Jah-Jah's Closet

- Aug 26, 2019
- 5 min read
Updated: Sep 1, 2019
During the process of trying to make my website and product photo's appear more 'professional' and easy on the eye. I decided to look into how to improve my product photography without the need to hire a professional photographer, studio, or buy a very expensive high MP camera.
In my search I discovered, 'The Light Box for Photography'.
For those who were unaware (like myself) of such a thing, it is... (Description pasted from Google), "a flat box having a side of translucent glass or plastic and containing an electric light, so as to provide an evenly lighted flat surface or even illumination, such as in a studio."
I was pretty ecstatic about the fact that there was actually a solution to my problem, so my next move was Pinterest to see if I could make one! 😁
Since becoming a crafter, Pinterest and Youtube tend to have ALL the answers for me, and of course, they did! A quick search pointed me in the right direction of the tools and materials I needed to gather, to make my very own Light-box.
After reading and watching a few different D.I.Y examples, I realised I could actually attempt to make a very basic, very cheap version with the materials I already had at home! 👍🏾
(As I only thought to make this blog after I'd finished the quick fix box, I went ahead and got Tissue Paper and made a larger better light-box that would last a lot longer).
In this blog, I will be sharing with you how I made my Light-box, and how I made my quick fix light-box, if your impatient like myself and have the materials! 😂
(The images I will be using in this Step by Step are from the newer light-box, but i will list below the materials and tools I used to make both).
Here is an example of the difference in images with and without the Light-Box.
The first image was taken in good daylight, and the second image was taken with the light-box in similar daylight lighting. I used the same camera for both, which was a 16 megapixel Samsung phone camera.


The tools you will need are;
Scissors & a sharp knife (or a Box Cutter would be perfect)
Pencil & a ruler
A square shaped cardboard box (whichever size you would like your light-box to be. For the quick-fix, I used a small box to work better with the tissues I had).
Tissue paper - White - Hobbycraft OR White 2 ply tissue (Quick fix) - Tesco
Sellotape and Double sided tape.
White card (Any size that fits inside your box, I used A3 & cut to size) - Hobbycraft
White ready mixed paint (Optional) - Hobbycraft
LED photography lights - Amazon OR LED Desk Lamps (Quick Fix) - Argos


Step by Step Method.
(For the quick fix option, please read and note the alternative materials for some steps).
Step 1. To begin, you will need your Pencil, Ruler, Scissors & Knife or Box Cutter, your cardboard box and your sellotape. (If your box is flat packed as mine was, put it back together leaving an opening for if you was to go ahead and pack something inside).
QUICK FIX - I used a small cardboard box i'd received an Amazon delivery in. The box was sized around, 8" x 6.5" (Length x Height). (Please note; the normal tissues I used, fit perfectly over the windows for that size box).

Step 2. Sellotape the opening flaps together to create a larger box with no top. (for my smaller quick fix light-box, I cut off the lid flap that would be at the top).


Step 3. Once this is done, use your pencil and ruler to draw the size of your 'windows' on the top, left, and right sides of the box. (see images below)
Step 4. Use the knife to slice or create a hole for you to then cut with the scissors or use your box cutter to cut out the squares on all 3 sides. (You could also use the knife to cut).


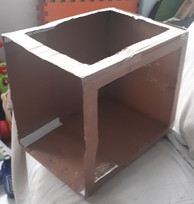


Optional Step. I went ahead and added plain white paper to the inside front corner/edges, to make the box slightly more secure and sturdy. (also to hide the gaps from taping the flaps together). You could also use white card, which would be stronger.
You should now have a box that looks like the image below. 👇🏾👇🏾👇🏾

Optional Step. I reinforced the side strips of the box by adding extra card-board, (I used the cut-outs left from my box), to make them stronger as they were quite flimsy and bent easily, causing the box not to stand straight or flop at the front. (See image below, I circled in red the parts I reinforced).

Step 5. Use your tissue paper to cover each window of your box.
As you can see in the first image, my paper was pretty large so i only needed to use 2 sheets and cut them in half.
QUICK FIX - I used two sheets of standard 2 ply tissue from a box of tissues that I have in my home. The tissues used covered the windows perfectly.
I split each sheet of tissue into two 1 ply pieces, (to make them more transparent).


Step 6. (Optional) If you would like your box completely white inside, you can paint it with white paint. To do this, use any white paint and paint the inside edges of your windows. (You can see an example of this on my Quick Fix Light-Box).
Step 7. Line the inside of the box with your white card. I used two A3 size for my larger box and it fit perfectly. For the Quick Fix I had to cut it to size.
Use the double sided sticky tape to stick the card down, this will help create a smooth background for your photos. (You could use whichever coloured card background you prefer).


Your light-box is now complete and ready to use.
Step 8. Set up your lights so they are shining into your light-box. If you have 2 lights, place one on the left and one on the right. Having 3 lights will give you a brighter light, and likely better quality photos as you could also place it to shine through the top of your box.
QUICK FIX - For lighting I used 2 LED desk lamps which were flexible enough for me to adjust them to the right position.


My finished light-box with my LED photography lights.

My finished Quick Fix Light-Box with LED desk lamps.

I hope this step by step has helped, or even inspired you to go ahead and make your own light-box!
Please feel free to comment below if you do or tag me in your makes! @jahjahscloset #jahjahscloset


Your DIY light-box guide is incredibly helpful, and your detailed instructions paired with images make it easy to follow. Thanks for sharing this creative solution for improving product photography on a budget! https://www.xanderkostroma.uk/ourshop/cat_1807637-Crystal-Jewellery.html